There are 5 turrets in Creeper World, 4 regulars as well as a special fifth one. Each turret has a specific role, there's no jack-of-all-trades turret which is your bread and butter. Also you cannot upgrade your turrets, therefore you must plan whether and where you will need each turret. with the exception of the drone hangar all the turrets can survive being touched by the creeper, long enough at least for you to decide if you should move them or if they'll be able to clear the creeper away themselves or with any help you might bring in.
A note: Damage is measured in elevation levels of creeper; "1" is the height of creeper in a 'pool' that's one level below its surroundings. Color of creeper is not a very accurate way of telling how deep it is -- creeper is less than 1 level deep even through 4 or more color changes.
Creeper World 1[]
Blaster[]
- Main article: Blaster .
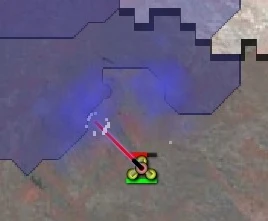
The blaster is the first turret you'll be introduced to, it's a simple laser with a fast firing rate and though it has the smallest range of all the turrets it doesn't suffer from that. If any turret could be your bread and butter turret it would most certainly be the blaster, it can take care of any threat to one degree or another. Essentially your blasters are best designed to hold back the creeper on plains, shallow and large waves of creeper which can be chipped away quickly and efficiently by the blaster's high firing rate. To a lesser extent blasters can also keep pools of creeper from overspilling but that's a mortar's job though, in a pinch, blasters will do the job for a while.
Blasters are also unique in that they are the only turret capable of capping emitters (with the exception of Thor). Capping an emitter involves getting a blaster (or several depending on the strength and output of the emitter) within firing range of the emitter so that the blaster will destroy any creeper the emitter produces before it has a chance to spread out. Blasters are also useful during spore waves though you have to be very lucky for this to happen: When a spore hits, all its creeper is concentrated in one space, if a blaster is within range of the impact, one shot will destroy all the creeper, thus preventing the spore from doing any damage unless it lands directly on top of something or if the spore contains more creeper than the blaster can handle in one shot. Beware though as blasters cannot fire at something that is higher up than itself, so in order to deal with creeper above the blaster you either need to soften it up with other weapons like mortars and drones, or jump the blasters up to the next level into the creeper, it's risky, it will damage the blasters a little bit, but as long as you can get ammo to them before they run dry it will almost always work.
The Blaster is the first weapon you have access to in the Creeper World Demo and Full Version. It fires at any nearby creeper within 5 building blocks, in a straight line.
When it fires, the fire point removes all creeper in an x - shape line within 1 building space radius.
A Blaster costs 25 building packets to build, and 10 energy packets to power.
It uses one fifth of an energy packet when it fires.
Blasters can be used as connectors for relays and collectors.
A well used and time tested tactic is to leapfrog blasters over each other, into advancing creeper, making sure to build collectors or relays as you go along to provide continuous ammo for the blasters, in this way the blasters gain you ground and wear down the creeper slowly. Usually, two or three blasters are used for this tactic, but it all depends on how strong the creeper is and how fast it's advancing.
STATS
RANGE: 6 squares
FIRE RATE: 6 / sec
DAMAGE: -1 over 8 squares
PRODUCTION COST: 25 Packets
FULL POWER UP: 10 Packets
ENERGY USE: 0.2 Packets per Shot
Mortar[]
- Main article: Mortar.
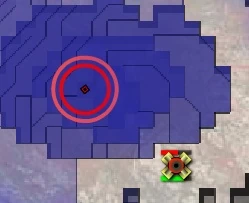
The mortar is the next turret you'll gain access to. It lobs shells at the creeper, clearing out a moderately large amount of it. What makes the mortar different from the blaster is that the mortar is able to completely eliminate the depth of the creeper where its shell hits. This means that it doesn't matter if the creeper is 1 section deep or 4, one mortar blast will penetrate all the way to the bottom and destroy all the creeper in the blast radius. To this end mortars always fire at the deepest creeper in range, this makes them excellent for taking out any pools of creeper and forcing the creeper to fill up the pool again, whereupon
the pool will be destroyed again, over and over as long as there's constantly a supply of ammo. Mortars take more energy packets to build and maintain so it's terribly energy inefficient to waste their shots on shallow creeper.
Mortars can also serve as a substitute for drones. If there are no drones handy you can build a mortar, stock it with ammo and fly it off into enemy territory, you can land it next to a pool of creeper which you want cleared away but which is deep inside the creeper covered area. Once the mortar lands it will proceed to wipe out any nearby pools of creeper until it runs out of energy, at which point you should promptly fly it back to base for refueling. Sure it will get damaged, but it wont get destroyed and you pay nothing for it to self repair. If you want the mortar to take next to no damage you can micromanage it while its shelling the creeper. Land the mortar next to the pool, let it get off a shot, then fly it away, after a second or two, fly it back and let it fire again, then take off again, rinse and repeat till you're satisfied or need more ammo, this means that the mortar is never touching the creeper longer than is needed to get a shot off, excessive use of pausing is advised in this case. In both cases the mortar acts as a substitute for a drone, but is by no means a replacement for one, if you have the option to build a drone, build a drone, it does the job better. But when you can't or don't want to build a drone, the mortar's your friend.
Mortars have a fairly slow firing rate compared to the other turrets but any faster and you'd most likely be wasting its shots as the creeper would have no time to pool before the next shell hits. From full a mortar has enough ammo for around five or six shots before going empty.
STATS
RANGE: 9 squares
FIRE RATE: 1 / sec
DAMAGE: -4 over 36 squares
PRODUCTION COST: 50 Packets
FULL POWER UP: 30 Packets
ENERGY USE: 2.4 Packets per Shot
SAM[]
- Main article: SAM .
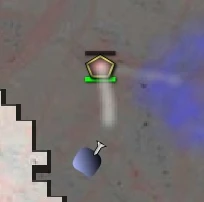
The SAM, as its name implies (Surface to Air Missiles), is your anti-air defenses or rather, anti-spore. Whenever you're on a map with
incoming spore waves you need to build SAMs. The missiles they fire have a good range and each one destroys a single spore, they also home in. Even if their target is destroyed (either by another missile or having already struck the ground) the missile will immediately seek out another target if there is one on screen. If not it will simply fly off the screen and out of existence. SAMs don't have any other use other than destroying spores but they are a vital part of your defenses since without them, you would be at the mercy of incoming spores. Fortunately you are notified when you start the map if there are any spore waves incoming so you'll know whether to build SAMs or not.
Each SAM fully loaded is able to fire two missiles before going empty, they request ammo packets at a fast rate so make sure you have the energy to supply them otherwise you might find your starvation jumping up quickly. If the SAM is located near Odin City or you have many speeds built then the capacity of the SAM for taking down spores increases many times since the SAM will be able to receive energy almost as fast as it can spend it, it could take down many more than just two spores, a SAM situated right next to Odin City could take 5 or 6 or even more spores as the ammo packets flood into it due to its high firing rate.
STATS
RANGE: 9 squares
FIRE RATE: 1 / sec
DAMAGE: Destroy Spore
PRODUCTION COST: 20 Packets
FULL POWER UP: 8 Packets
ENERGY USE: 4 Packets per Shot
Drone[]
- Main article: Drone .
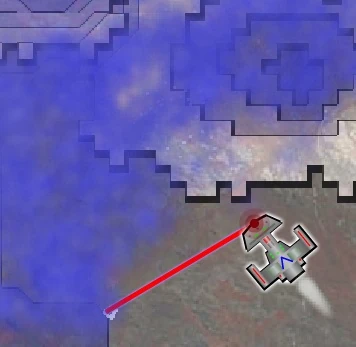
Drones are your bombers. They fuel up on ammo in the hangar, you select a target for them and they launch off to bomb the target area. Their bombs are much like mortar shells in that they cut deep into the creeper and have a wide blast radius. There's no limit to targeting, a drone can be launched from one side of the map to bomb a pool on the opposite side. Drones deliver a payload


of 3 or 4 bombs per run and make around 4 runs before they need to head back to the hangar to reload. This makes the drones the best pool control you can build since they not only wipe out all the creeper in the target area but can cut right through any pools its bombs drop on, setting the creeper's progress back greatly. Drones use up a lot of energy to refuel though so you should make sure you have a surplus of it whenever they return to reload. Flying a mortar in cannot replace a drone for the sheer destruction a drone can do to the creeper in one bombing run is many times greater than what a mortar can do.
If a drone's hangar is destroyed the drone is destroyed too even if in flight, so keep the hangars well back from the front lines and on higher ground if possible. Remember to keep your drones in the air bombing targets, its unlikely there's no pools for you to bomb and if by a small chance there isn't, the drone can bomb just behind the front line of creeper and help your blasters push forward much quicker.
STATS
RANGE: Anywhere
FIRE RATE: 0.9 / sec
DAMAGE: -4 over 50 squares
PRODUCTION COST: 50 Packets
FULL POWER UP: 24 Packets
ENERGY USE: 1.6 Packets per Shot
Thor[]
- Main article: Thor .
The Thor is this game's super weapon: it takes a lot of time and energy to build, but once it's built you've won. Thor is akin to a huge

aircraft that looks a lot like a Terran Battlecruiser from Starcraft. It has lasers as fast as a blaster which fire at the range of an upgraded mortar and which have a blast radius about as large as the area a drone covers in its bombing run, and to top it all off it has enough missiles to utterly wipe out any incoming spore waves and then some. Rightly so, the Thor is only available in the final mission of the campaign and certain custom maps. The Thor flies to the area you indicate and hovers indefinitely, obliterating anything within range. Once deployed, the Thor continues to follow your commands and fire indefinitely, with no need to return to gather more energy.
STATS
LASER RANGE: 12 squares
LASER FIRE RATE: 6 / sec
LASER DAMAGE: -4 over 200 squares
MISSILE RANGE: Whole map
MISSILE FIRE RATE: 3.6 / sec
Creeper World 2[]
Blaster[]
Blasters fire a heavy laser, which targets at the nearest creepeer and damages it. As with Creeper World 1 the blasters are your bread and butter units. The blaster fires quickly but has a short range but combining these together they can stop creeper providing there is a some repulsors or some launchers around the place. These are essential for levels with drones in as they are the one of the few units that can target them (along side makers.)
Launcher[]
Lauchers looks like the Mortar and the Drone in CW1 and has a same power as Mortars. They create a rocket every 10.0 second and they use a lot of supply when shooting a rocket. When you upgrade the fire rate. The rate will decrease a little.
Creeper world III/3[]
Cannons[]
Cannons are the first weapon to be introduced in the game.This is a similarity of the Blasters from CW1 and CW2.Instead on firing plasma and heat damage,it shoots off cannon balls that deals kinetic damage.In Normal,This takes 25 Building packets to build.
Mortar[]
Like the first game, Mortars shoot bombs/mortar balls in a high range.In this game,It is recolored Red instead of yellow. Mortars are your 2nd introduced unit and like CW1,It has a High shooting damage,High range but Long fire rate. Takes 40 building packets.
Strafer[]
Strafers are airborne units that function similarly to the drones from CW1. Upon being deployed, Strafers fly to the targeted area and pepper any present creeper with cannon-like projectiles. A single click when deploying a Strafer will cause it to perform multiple attack runs at different angles towards a specific target. Clicking and dragging allows the user to define a specific attack angle for a Strafer to use.